Drawing with SwiftUI
Paths, Shapes and the Canvas
Thanks to SwiftUIs flexible and composable view system, many, if not all, tasks can be accomplished without any custom drawing. However sometimes juggling with views is not the most straightforward way of achieving the UI we are aiming for. Fortunately, SwiftUI provides several tools that we can use to draw on the screen. The three (or rather two and a half) main tools at our disposal are Paths, Shapes and the Canvas.
In this article we are going to explore each of them individually , discussing their pros and cons and uncover why I consider there to be only two and a half drawing tools. Let’s dive in!
Paths: The building block
Paths are the fundamental building blocks of the SwiftUI drawing system.
They provide a basic functionality for drawing any complex path in the context of the parent view. While there are many differences between the two, for those of you familiar with UIKit, the closest thing to a Path is a UIBezierPath
Path { path in
path.move(to: .zero)
path.addLine(to: CGPoint(x: 100, y: 100))
path.addLine(to: CGPoint(x: 300, y: 0))
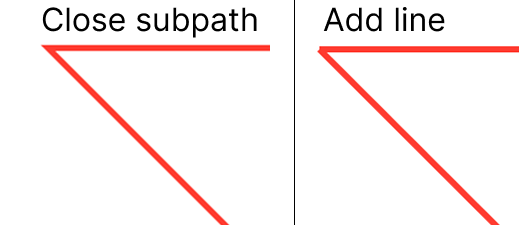
path.closeSubpath()
}
.stroke(.red, lineWidth: 2)
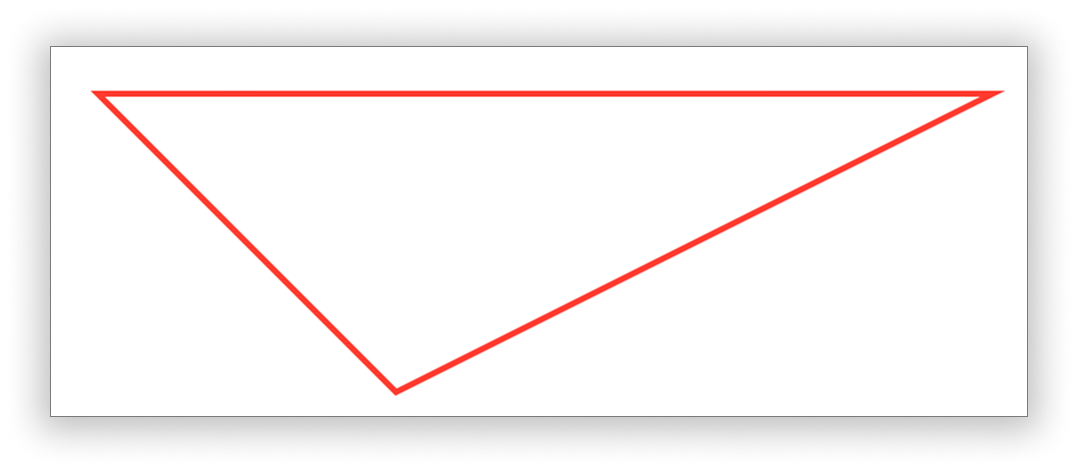
💡 Note: The use of
closeSubpathensure that the path is correctly closed. You could useaddLineto seemingly close a path but that would result in an unpleasent edge seem
As I said before, paths are drawn in the frame of their parents but they don’t have any knowledge about it and the coordinates used for drawing are absolute coordinates. This means that paths on their own are not really flexible. The resizing of the parent can easily lead to the drawn path overflowing or not filling all the available space and there is no way to dynamically change this without using any external tools for example a GeometryReader
GeometryReader { proxy in
	Path { path in
        path.move(to: .zero)
        path.addLine(to: CGPoint(x: 100, y: 100))
        path.addLine(to: CGPoint(x: proxy.size.width / 2, y: 0))
        path.closeSubpath()
    }
    .stroke(.red, lineWidth: 2)
 }
An other important detail is that the path on its own only defines the lines that will make up your rendered object. Any styling needs to be done with the usual modifiers like .stroke() and .fill(), this means that every section of a path will have the same style and there is no way of changing this without using a more advanced techinuqe.
Shapes: Reusable and Resizable
The next step towards the more advanced spectrum of our toolset is a Shape. You can think of a Shape as a convenience wrapper for a path wrapped in a GeometryReader. The following code is equivalent to the previous example
struct Triangle: Shape {
    func path(in rect: CGRect) -> Path {
        Path { path in
            path.move(to: .zero)
            path.addLine(to: CGPoint(x: 100, y: 100))
            path.addLine(to: CGPoint(x: rect.width / 2, y: 0))
            path.closeSubpath()
        }
    }
}
As you cans see, the Shape protocol requires a function that generates a Path just like before. The only difference is that this time, the shape receives the rectangle it is going to be drawn in, this way allowing the Path to be more flexible and reusable. This is also the reason why at the beginning of the article I have referenced only two and a half SwiftUI tools.
Now let’s look a more complex example of a shape to demonstrate its power
struct ColorfulFan: Shape {
    let numberOfBlades = 8
    private let centerGap = 5

    func path(in rect: CGRect) -> Path {
        Path { path in
            let pivot = CGPoint(x: rect.midX, y: rect.midY)
            let bladeOffsetAngle = 360 / numberOfBlades

            let bladeWidth = rect.width / 3
            let arcRadius = bladeWidth / 2
            let bladeSideWidth = (rect.height / 2) - CGFloat(centerGap) - arcRadius * 2

            for i in 0..<numberOfBlades {
                let transform = CGAffineTransform(translationX: pivot.x, y: pivot.y)
                    .rotated(by: Angle.degrees(Double(i * bladeOffsetAngle)).radians)
                    .translatedBy(x: -pivot.x, y: -pivot.y)

                let topArcCenter = CGPoint(x: Int(rect.midX),
                                           y: Int(arcRadius))
                                    .applying(transform)
                let bottomArcCenter = CGPoint(x: Int(rect.midX),
                                              y: Int(arcRadius + bladeSideWidth))
                                    .applying(transform)

                let offsetAngle = i * bladeOffsetAngle
                let topArcStartAngle = Angle.degrees(Double(0 + offsetAngle))
                let topArcEndAngle = Angle.degrees(Double(180 + offsetAngle))

                let bottomArcStartAngle = Angle.degrees(Double(180 + offsetAngle))
                let bottomArcEndAngle = Angle.degrees(Double(0 + offsetAngle))

                path.addArc(center: topArcCenter,
                            radius: arcRadius,
                            startAngle: topArcStartAngle,
                            endAngle: topArcEndAngle,
                            clockwise: true)
                path.addArc(center: bottomArcCenter,
                            radius: arcRadius,
                            startAngle: bottomArcStartAngle,
                            endAngle: bottomArcEndAngle,
                            clockwise: true)
                path.closeSubpath()
            }
        }
    }
}
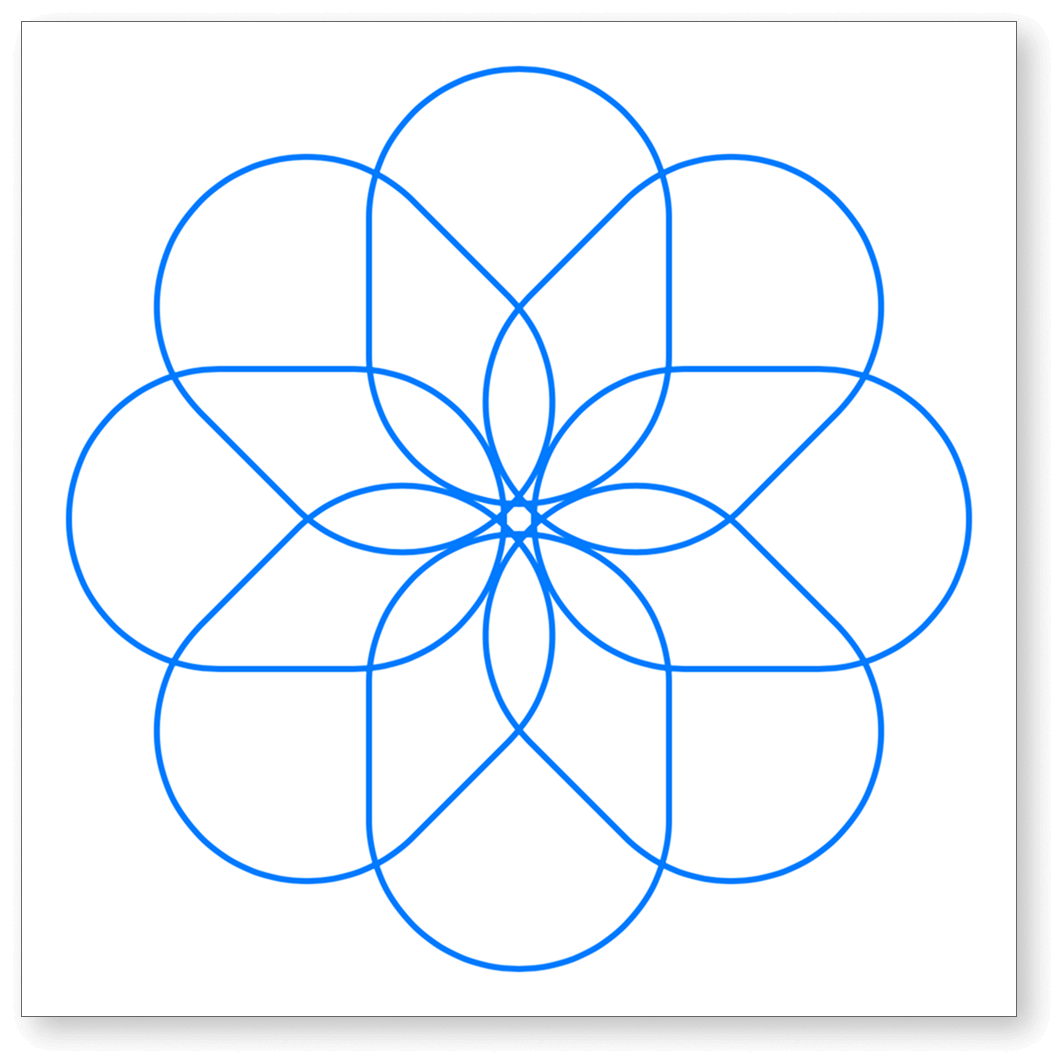
As you can see, this shape heavily relies on the dimensions of the container to be able to correctly calculate the position of each line which would be impossible with just a shape alone, or at least it would require us to define a hardcoded frame size which would completely remove the flexibility of our code.
One downside of shapes however is already visible with this example. As I said, a Path only defines the lines of a shape, which means we are not able to set different colours for different segments of the path. Fortunately, our next tool solves this issue.
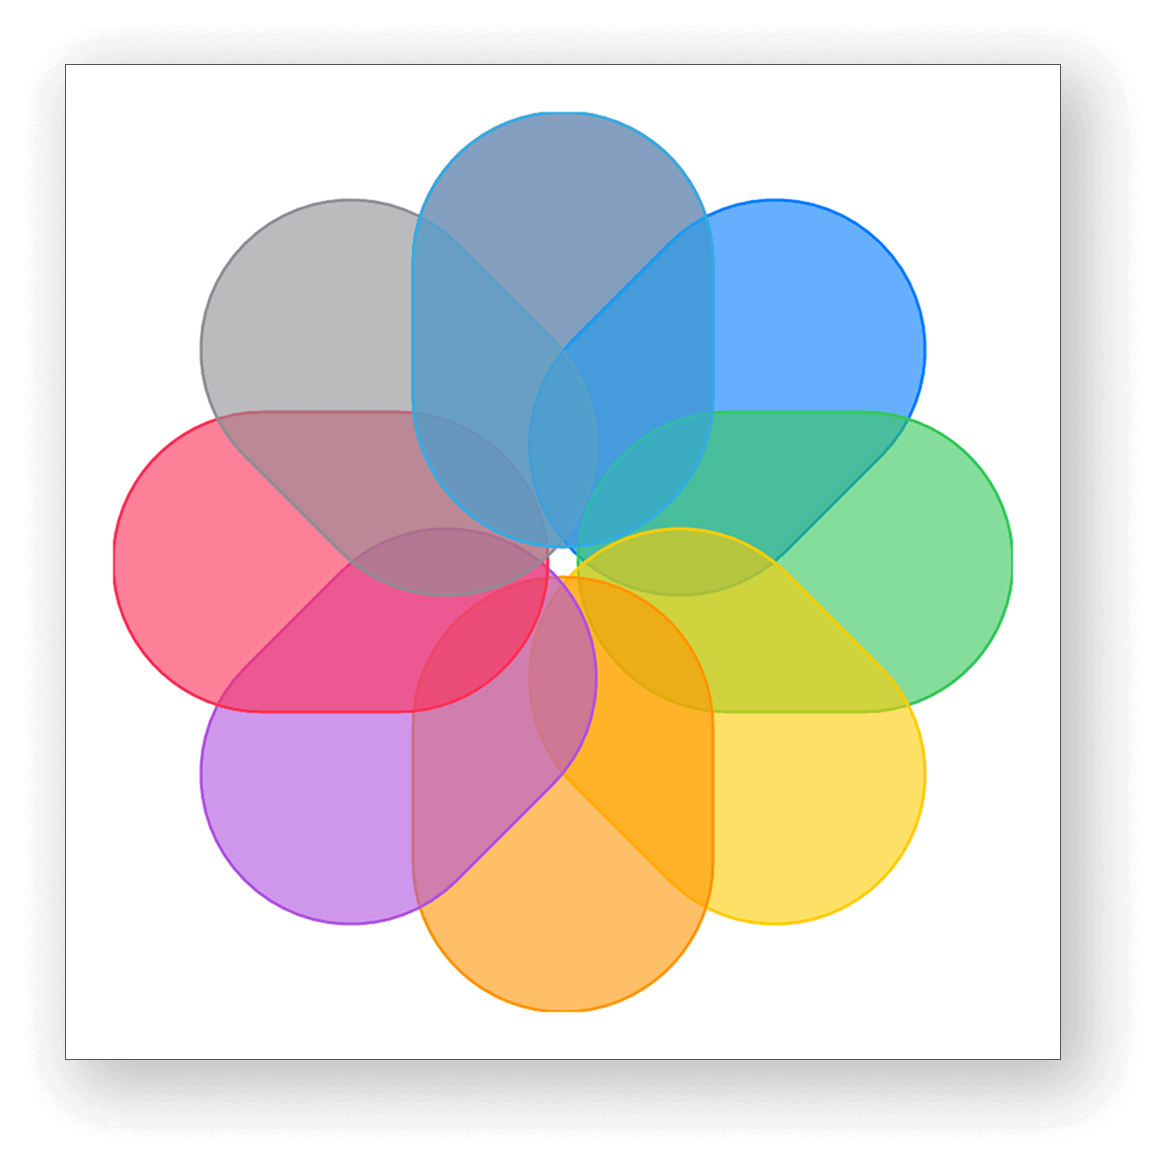
Canvas: For the advanced stuff
A canvas it the most advanced drawing method in SwiftUI (at least without leaving SwiftUI). It offers access its target frame’s size and a graphics context. You can think of this context as a CGContext but a lot more SwiftUI like. It works with Paths but allow you to fine tune how each path is drawn. Let’s rewrite our previous example having each blade have a different colour.
First, let’s create a Shape that represents one blade of our colourful fan
struct FanBlade: Shape {
    let pivot: CGPoint
    let angle: Angle
    let bladeWidth: Double
    let bladeHeight: Double
    var centerGap: Double  = 5

    var arcRadius: Double {
        bladeWidth / 2
    }

    var bladeSideWidth: Double {
        bladeHeight - centerGap - arcRadius * 2
    }

    func path(in rect: CGRect) -> Path {
        var path = Path()

        let transform = CGAffineTransform(translationX: pivot.x, y: pivot.y)
            .rotated(by: angle.radians)
            .translatedBy(x: -pivot.x, y: -pivot.y)

        let topArcCenter = CGPoint(x: Int(rect.midX),
                                   y: Int(arcRadius))
                            .applying(transform)
        let bottomArcCenter = CGPoint(x: Int(rect.midX),
                                      y: Int(arcRadius + bladeSideWidth))
                            .applying(transform)

        let offsetAngle = angle.degrees
        let topArcStartAngle = Angle.degrees(Double(0 + offsetAngle))
        let topArcEndAngle = Angle.degrees(Double(180 + offsetAngle))

        let bottomArcStartAngle = Angle.degrees(Double(180 + offsetAngle))
        let bottomArcEndAngle = Angle.degrees(Double(0 + offsetAngle))

        path.addArc(center: topArcCenter,
                    radius: arcRadius,
                    startAngle: topArcStartAngle,
                    endAngle: topArcEndAngle,
                    clockwise: true)
        path.addArc(center: bottomArcCenter,
                    radius: arcRadius,
                    startAngle: bottomArcStartAngle,
                    endAngle: bottomArcEndAngle,
                    clockwise: true)
        path.closeSubpath()

        return path
    }
}
As you can see we took the code from the previous loop and made one shape to make it reusable. Our shapes takes in the center point of the fan and the angle of the current blade alongside with it’s dimensions to be able to create the path.
The next step is to create a canvas that relies on this shape to draw our fan. The canvas will make use of the FanBlade shape we have just defined in order to generate multiple blades but will make sure to draw them with different colours.
struct ColorfulFanCanvas: View {
    let numberOfBlades = 8
    private let centerGap = 5
    private let colors: [Color] = [.red, .blue, .green, .yellow, .orange, .purple, .pink, .gray, .cyan, .brown]

    var body: some View {
        Canvas { context, size in
            let rect = CGRect(origin: .zero, size: size)
            let pivot = CGPoint(x: rect.midX, y: rect.midY)
            let bladeOffsetAngle = 360 / numberOfBlades

            let bladeWidth = rect.width / 3
            let bladeHeight = rect.height / 2

            for i in 0...numberOfBlades {
                let angle = Angle.degrees(Double(i * bladeOffsetAngle))
                let color = colors[i % colors.count]
                let blade = FanBlade(pivot: pivot,
                                     angle: angle,
                                     bladeWidth: bladeWidth,
                                     bladeHeight: bladeHeight).path(in: rect)
                context.stroke(blade, with: .color(color))
                context.fill(blade, with: .color(color.opacity(0.6)))
            }
        }
    }
}
Conclusion
I hope at this point it became clear how the different puzzle pieces of SwiftUI’s drawing system all come together. As we have seen, the Path component is mostly used as a building block rather than a standalone piece, the Shape protocol is one step further, perfect for encapsulating drawing logic into a reusable and resizable component and finally canvas can be used to combine multiple Shapes with different styles an colours but not only. While it is out of scope of this article, we can't ignore the fact that Canvas is much more than that. The GraphicsContext is capable of any kind of 2D drawing you would need for your applications
In a following article we will dive into different methods to bring these drawings into life through animations, so make sure you don’t miss it
Related articles
Here are some more articles that may interest you. Check them out!
The TimelineView
published on November 2, 2025
SwiftUILearn how to use SwiftUI’s TimelineView to build time‑based animations. This article explains scheduler options, shows practical examples (pauseable clock, smooth minute‑progress ring with hue shifts and tick marks), and helps you choose the right schedule for smooth or precise updates.
Read moreContainer Relative Frame
published on September 18, 2025
SwiftUILearn how to use the containerRelativeFrame modifier in SwiftUI to create proportional layouts. This article explains both variants of the modifier, how containers are determined, and provides practical examples for building flexible, responsive UIs.
Read moreMatched Transitions in SwiftUI
published on September 23, 2025
SwiftSwiftUIAnimationsLearn how to use matchedGeometryEffect and navigationTransition in SwiftUI to create smooth, visually engaging transitions between views and screens. This article covers practical examples for synchronizing view geometry and implementing the new zoom navigation transition, helping you build more dynamic and polished UIs.
Read more