Foundation Models
Running LLMs locally
Among many other features, iOS 26 marks the introduction of Apple's foundation models. A framework that allows developers to access on devices Language models. This opens the door for a whole new category of apps. While these models are nowhere near their in cloud counterparts when it comes to performance, there are three major areas where they really shine: Security, Cost and Availability. For many small tasks, the costs of using an LLM is just not feasible, and accessing remote resources always adds delay thanks for networking times. I think the security aspect doesn't even need explanation.
In this article, we are diving deep into how to use Apple's foundation models to it's true potential. We are going to build a small chat app that will be annotated with a couple extra features so we can present all the different options of the framework. Let's get started.
The UI
We will use a very simple SwiftUI view that resembles the default iMessage app:
struct ContentView: View {
    private enum MessageSource {
        case user
        case agent
    }
    private struct Message: Identifiable {
        var id = UUID()
        var source: MessageSource
        var text: String
    }

    @State private var messages: [Message] = []
    @State private var message: String = ""

    var body: some View {
        VStack {
            ScrollView {
                LazyVStack(spacing: 10) {
                    ForEach(messages) { message in
                        VStack(alignment: message.source == .user ? .trailing : .leading) {
                            Text(message.text)
                                .padding(.vertical, 5)
                                .padding(.horizontal, 6)
                                .background(
                                    RoundedRectangle(cornerRadius: 10)
                                        .fill(
                                            message.source == .user ? .blue : .gray
                                        )
                                )
                        }.frame(maxWidth: .infinity,
                                alignment: message.source == .user ? .trailing : .leading)
                    }
                }
            }.defaultScrollAnchor(.bottom)
            HStack {
                TextField("Message", text: $message)
                Button {
                    sendMessage()
                } label: {
                    Label("Send", systemImage: "arrow.up")
                }
                .buttonStyle(.plain)
                .padding(.vertical,5)
                .padding(.horizontal, 8)
                .foregroundStyle(.white)
                .background(Capsule().fill(.blue))
            }
        }
        .padding()
    }

    func sendMessage() {
        withAnimation {
            messages.append(Message(source: .user, text: message))
        }
        message = ""
    }
}
We are using a simple message struct that holds the text of the message as well as the source of the message. At this point we are not talking to the model yet, just appending messages to the message array.
💡 Note: The use of
.defaultScrollAnchor(.bottom)ensures the new items always show up at the bottom of the list
Let's add the LLM
To interact with the the foundation models, import FoundationModels and create a new session. The session is used to lead a conversation with an agent. It can be stored so the agent will have context of the previous conversation, but it can also be recreated every time if the use case doesn't require context. In SwiftUI, the session can be stored as a state
@State private var session = LanguageModelSession()
By default, the session will use a general model, without any further configuration. According to apple, the general model is specialised in creative tasks and Q&A. The other type of model available at the writing of this blog post is the one used for content tagging. You can create one using SystemLanguageModel(useCase: .contentTagging)
To help the model better suit our use case, we can also initialize it with instructions. Let's say for our example, the model is a real estate specialist that helps with real estate investments.
@State private var session = LanguageModelSession(instructions:  """
    You are a real estate specialist answering questions of a soon-to-be home buyer
""")
💡 You can also provide a
Transcriptto the session which allows you to restore previous conversations easily
Talking to the model is also very easy. Let's update our sendMessage function to get a response from the agent:
func sendMessage() async throws {
    withAnimation {
        messages.append(Message(source: .user, text: message))
    }
    message = ""

    let response = try await session.respond(to: message)
    withAnimation {
        messages.append(Message(source: .agent, text: response.content))
    }
}
Of course we also have to update the call site to accomodate for the function now being async and throwing. Also, as a finishing touch, we can use the sessions isResponsing property to disable user imput while the model is generating a response
Button {
    Task {
        do {
            try await sendMessage()
        } catch {
            // Handle error
        }
    }
} label: {
    // ...
}.disabled(session.isResponding)

// After the list of messages

if session.isResponding {
    ProgressView()
        .progressViewStyle(.circular)
}
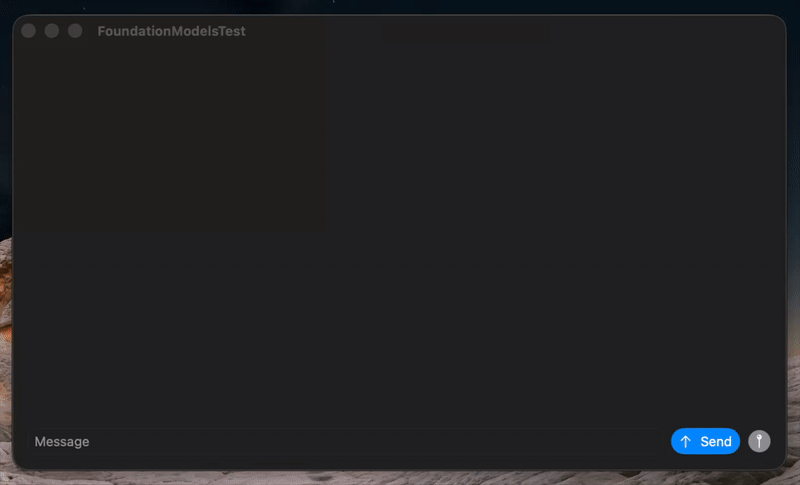
If you run this code, the result will be a simple real estate chat bot:
❗️ Don't forget: Foundation models are only available starting the iPhone 15 Pro and up. To make sure that the device the models are usable, use the
isAvailableoravailabilityproperties of a model (for example onSystemLanguageModel.default)
Creating a stream
If you have ever used an LLM based application, you may know that usually, the agent's response is streamed, and is showing in real time as it is being generated. Let's see how to achieve this effect:
func sendMessage() async throws {
    withAnimation {
        messages.append(Message(source: .user, text: message))
    }
    message = ""

    let stream = session.streamResponse(to: message)
    var messageAdded = false
    for try await response in stream {
        if messageAdded {
            withAnimation {
                let lastMessage = messages[messages.count - 1]
                let newMessage = Message(id: lastMessage.id, // reuse last id to preserve view identity
                                            source: .agent,
                                            text: response.content)
                messages[messages.count - 1] = newMessage
            }
        } else {
            messageAdded = true
            withAnimation {
                messages.append(Message(source: .agent, text: response.content))
            }
        }
    }
}
As you can see, we are using streamResponse(to:) which returns an async stream that is used to
wait every iteration of the response. Note that the partial result's content is always the full response generated up to that point, so we don't have to manually concatenate the pieces of the response
Let it JSON
A very common task when working with LLMs is generating some sort of structured data. This data is usually in the form of a JSON. This is what engineers at Apple realised and that's why they created Generable for us. Using a generable type, the foundation model will provide us with the exact data we want it to, without us having to worry about the correct format, processing and decoding. Let's see how it is done.
First, we need to create our model. This is very similar but not exactly the same as codable. We will create a simple struct, which is annotated with the @Generable macro. That's it, the compiler will take care of the rest.
@Generable
struct LocationInfo {
    @Generable
    struct Location {
        var lat: Double
        var long: Double
    }

    let inventorySize: Int
    let avgPrice: Double
    let location: Location
}
The only restriction we have is that all the properties of a generable type has to be generable. Primitive types are generable out of the box.
We can also provide additional context to help the model generate a certain property using the @Guide macro
@Guide(description: "Random integer")
let inventorySize: Int
@Guide(.count(2))
let countries: [String]
Once we have a model, generating data becomes trivial. We can use respond(generating:) passing in our generable type. Additionally, we can provide a prompt. Use includeSchemaInPrompt to decide wether the system should automatically append the JSON schema to the prompt, or you are providing it. Manually providing a schema can be useful for fine tuning the prompt.
func generateLocationInfo() async throws {
    let infoResponse = try await session.respond(generating: LocationInfo.self,
                                                 includeSchemaInPrompt: true,
                                                 prompt: { "Generate a random location" })
    withAnimation {
        messages.append(Message(source: .agent,
                                text: "",
                                locationInfo: infoResponse.content))
    }
}
Also note that I've extended the Message model with a locationInfo property to hold optionally generated data. Once this UI is also updated, we have the following results:

This is already nice, but we can make it nicer using a streamed response. That's right, we are able to use the streamed API for generating data as well. This is very similar to streaming a simple response, but instead of a text being generated, our data is generated progressively. To achieve this, the compiler creates a mirror of the generable type with the only difference that all the properties are optional.
Let's see how we have to change the generateLocationInfo method.
func generateLocationInfo() async throws {
    let stream = session.streamResponse(generating: LocationInfo.self,
                                        includeSchemaInPrompt: true,
                                        prompt: { "Generate a random location" })
    var messageAdded = false
    for try await response in stream {
        if messageAdded {
            withAnimation {
                let lastMessage = messages[messages.count - 1]
                let newMessage = Message(id: lastMessage.id, // reuse last id to preserve view identity
                                            source: .agent,
                                            text: "",
                                            locationInfo: response.content)
                messages[messages.count - 1] = newMessage
            }
        } else {
            messageAdded = true
            withAnimation {
                messages.append(Message(source: .agent,
                                        text: "",
                                        locationInfo: response.content))
            }
        }
    }
    }
As you can see we basically combined the previous two implementations. But there is one more thing. As I said the compiler creates a partial version of our model. So in order to be able to use response.content in our Message model, it has to be changed slightly:
var locationInfo: LocationInfo.PartiallyGenerated?
Tool, tools and tools
Last but not least, let's talk tools. You may already know, that the best way of extending the capabilities of a large language model is providing it with tools.
In essence, tools are custom pieces of code that the model can call whenever it considers necessary. For our example, we will implement a simple tool, that generates a random number in a given range
struct RandomIntTool: Tool {
    let name: String = "randomIntGenerator"
    let description: String = "Use this tool to generate a random integer between two values"

    @Generable
    struct Arguments {
        @Guide(.minimum(0))
        let lowerLimit: Int
        @Guide(.maximum(100))
        let upperLimit: Int
    }

    func call(arguments: Arguments) async throws -> Int {
        Int.random(in: arguments.lowerLimit...arguments.upperLimit)
    }
}
To get started, simply conform to the Tool protocol. It has 4 requirements. First we need to provide a name and a description for the tool. This helps the model determine what the tool is used for and when to call into it. Second, a generable struct has to be provided in order to serve as arguments passed in for our tool. In case you don't need any arguments, the struct can have 0 properties, but it's presence is necessary.
Finally, we have the call(arguments:) method which handles the actual functionality of the tool.
To expose the tool for the model, simply pass an instance in the tools array when creating the session:
@State private var session = LanguageModelSession(
    tools: [RandomIntTool()],
    instructions:  "..."
)
💡 If you want to be certain that the model is running you tool and not generating a number itself, feel free to add a print to the
callmethod.
Conclusion
Apple’s foundation models bring powerful on-device language capabilities to iOS, enabling developers to build secure, responsive, and cost-effective AI features. With support for chat, streaming responses, structured data generation, and custom tools, the framework opens up new possibilities for app experiences without relying on cloud-based solutions. As device support expands, exploring these models now will help you deliver innovative, privacy-focused features to your users.
Related articles
Here are some more articles that may interest you. Check them out!
The TimelineView
published on November 2, 2025
SwiftUILearn how to use SwiftUI’s TimelineView to build time‑based animations. This article explains scheduler options, shows practical examples (pauseable clock, smooth minute‑progress ring with hue shifts and tick marks), and helps you choose the right schedule for smooth or precise updates.
Read moreWorking with CoreBluetooth
published on September 30, 2025
SwiftiOSDiscover how to use CoreBluetooth in iOS to build apps that communicate with Bluetooth Low Energy devices. This article explains the roles of central and peripheral, how services and characteristics work, and provides a practical example for implementing both sides of BLE communication in Swift.
Read moreMatched Transitions in SwiftUI
published on September 23, 2025
SwiftSwiftUIAnimationsLearn how to use matchedGeometryEffect and navigationTransition in SwiftUI to create smooth, visually engaging transitions between views and screens. This article covers practical examples for synchronizing view geometry and implementing the new zoom navigation transition, helping you build more dynamic and polished UIs.
Read more