App Enums and App Entities
Elevate your App Intents to the next level
In the previous article about AppIntents, we have looked into how to integrate your app with the rest of the OS easily. We have discussed the basics and also more advanced techniques but there was one topic left out. In this article, we are going to explore the ways of extending the functionality of your app intents using AppEnums and AppEntitys.
While it is not mandatory to read the previous article in order to be able to follow this one, the code presented in this post builds on top of the one shown before.
Let's dive right into it!
AppEnum - For static data
Think about AppEnum as a regular swift enum. In fact, it is a regular enum that conforms to the AppEnum protocol. Just like with regular enums, you would not try to dynamically add values to an AppEnum at runtime either. They serve as a static list of values. Let's see how to create one:
enum ProgrammingLanguages: Int, AppEnum {
    static var typeDisplayRepresentation = TypeDisplayRepresentation(name: "Programming Language")
    static var caseDisplayRepresentations: [ProgrammingLanguages : DisplayRepresentation] = [
        .python: DisplayRepresentation(stringLiteral: "Python"),
        .swift: DisplayRepresentation(stringLiteral: "Swift"),
        .javascript: DisplayRepresentation(stringLiteral: "JavaScript"),
        .java: DisplayRepresentation(stringLiteral: "Java"),
        .kotlin: DisplayRepresentation(stringLiteral: "Kotlin"),
        .ruby: DisplayRepresentation(stringLiteral: "Ruby"),
        .csharp: DisplayRepresentation(stringLiteral: "C#")
    ]

    case swift
    case python
    case javascript
    case java
    case kotlin
    case ruby
    case csharp
}
As you can see, we start with a regular enum that conforms to the AppEnum protocol. It also requires our enum to be RawRepresentable, for this example, I've chosen the raw value to be Int.
💡 Note: If you want to learn more about the
RawRepresentableprotocol, read my previous article on the topic.
There are two more requirements to the protocol. typeDisplayRepresentation describes how the type should be presented on the UI. For the sake of simplicity, we are only specifying the name to be displayed.
caseDisplayRepresentations is similar but it defines how each case should be displayed instead of the type.
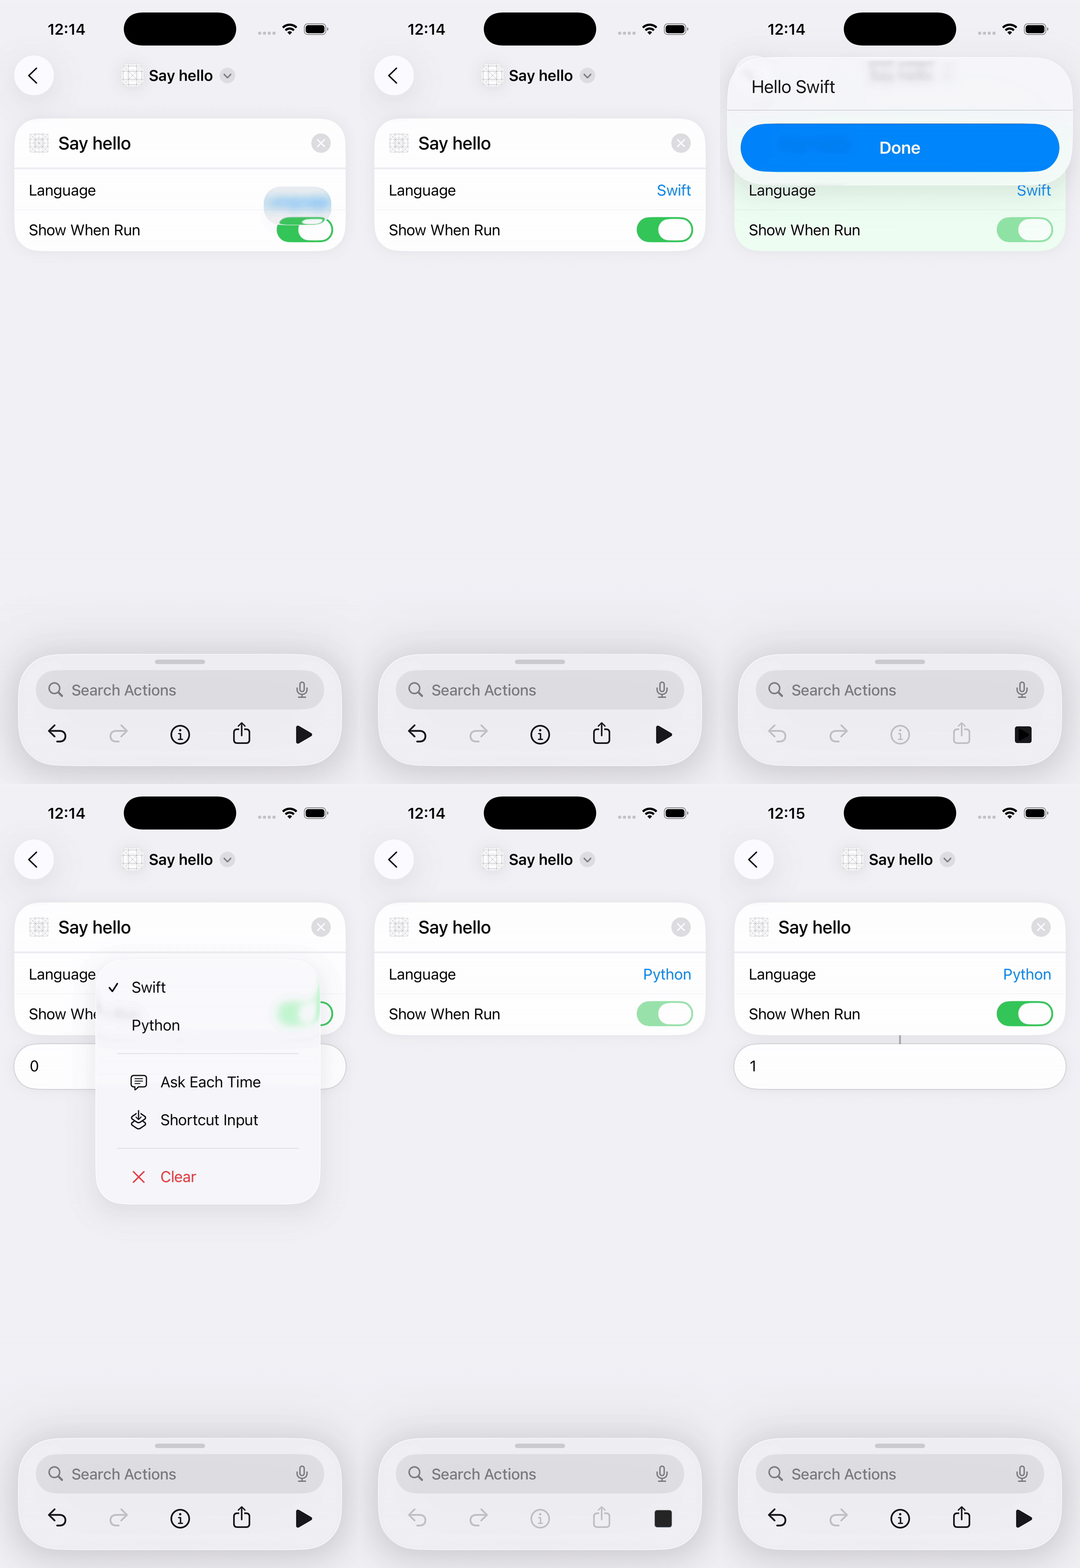
And now let's see how it can be used in an intent. Well, it couldn't be simpler than this:
struct HelloIntent: AppIntent {
    static let title = LocalizedStringResource("Say hello")

    @Parameter(title: "Language")
    private var value: ProgrammingLanguages

    func perform() async throws -> some ReturnsValue<Int> & ProvidesDialog {
        return .result(value: value.rawValue, dialog: "Hello \(value)")
    }
}
All it takes is changing the type of the parameter, the iOS will take care of the rest. Also note how we can use the raw value of the enum in order to perform any operation we need.

AppEntity - For the dynamic stuff
When you need to expose your app's data to the user, AppEntity is what you need. It's fair to say, this is the most complex part of this whole project and still, it's fairly easy. Let's see.
First, we need to create a struct and conform it to AppEntity, like this:
struct BlogPost: AppEntity {
    var id: String
    var name: String

    var displayRepresentation: DisplayRepresentation {
        .init(stringLiteral: name)
    }

    static let typeDisplayRepresentation: TypeDisplayRepresentation = "Blog Post"
    static let defaultQuery = BlogPostQuery()
}
The first requirement of the AppEntity protocol is that the type is Identifiable, hence the id property. We can freely add any other properties, so I've added a name for our blog post as well. After those, you can see the same typeDisplayRepresentation and displayRepresentation as before. They work the same as before, the only difference is that we don't define a list of values but construct the representation for each value apart.
Finally we have a property we haven't seen before. The defaultQuery is responsible for retrieving the possible values for our type in certain scenarios. For example, it can query the app's database, or read some resources.
⚠️ Note: While you can do network call in this query, the time allocated to the process of an AppIntent is very limited and should be managed wisely
struct BlogPostQuery: EntityQuery {
    static let dataStore = [
        "app-intents": BlogPost(id: "app-intents", name: "AppIntents: What are they and how to use them?"),
        "swiftui-animations": BlogPost(id: "swiftui-animations", name: "SwiftUI: Advanced animations")
    ]

    func entities(for identifiers: [BlogPost.ID]) async throws -> [BlogPost] {
        return Self.dataStore.values.filter { identifiers.contains($0.id) }
    }

    func suggestedEntities() async throws -> [BlogPost] {
        return Array(Self.dataStore.values.prefix(3))
    }
}
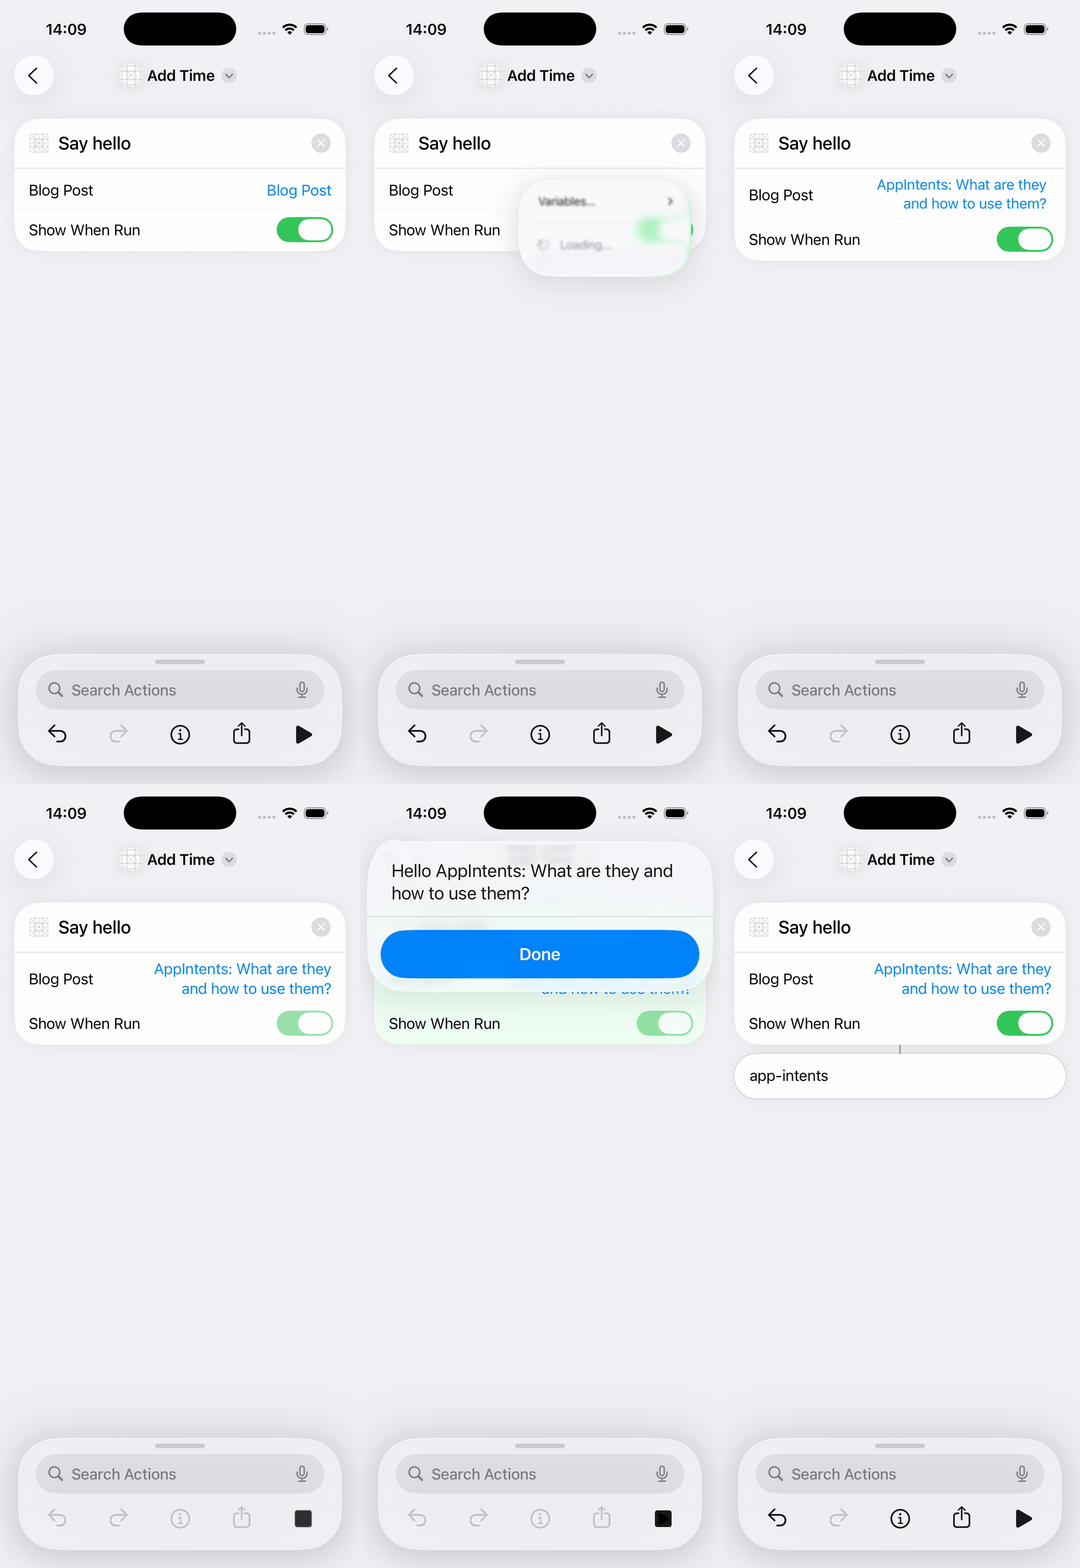
For the sake of this example, I've just created a static list of values we can use. The interesting part is the two methods entities(for:) and suggestedEntities. When our intent is used in shortcuts, the system will call suggestedEntities to show the user a list of options to choose from. If the shortcut is saved with a set value for our intent, only the id of the blog post is actually persisted, then later, when the shortcut is ran, entities(for:) is used to retrieve the right entity. Let's see the code in action

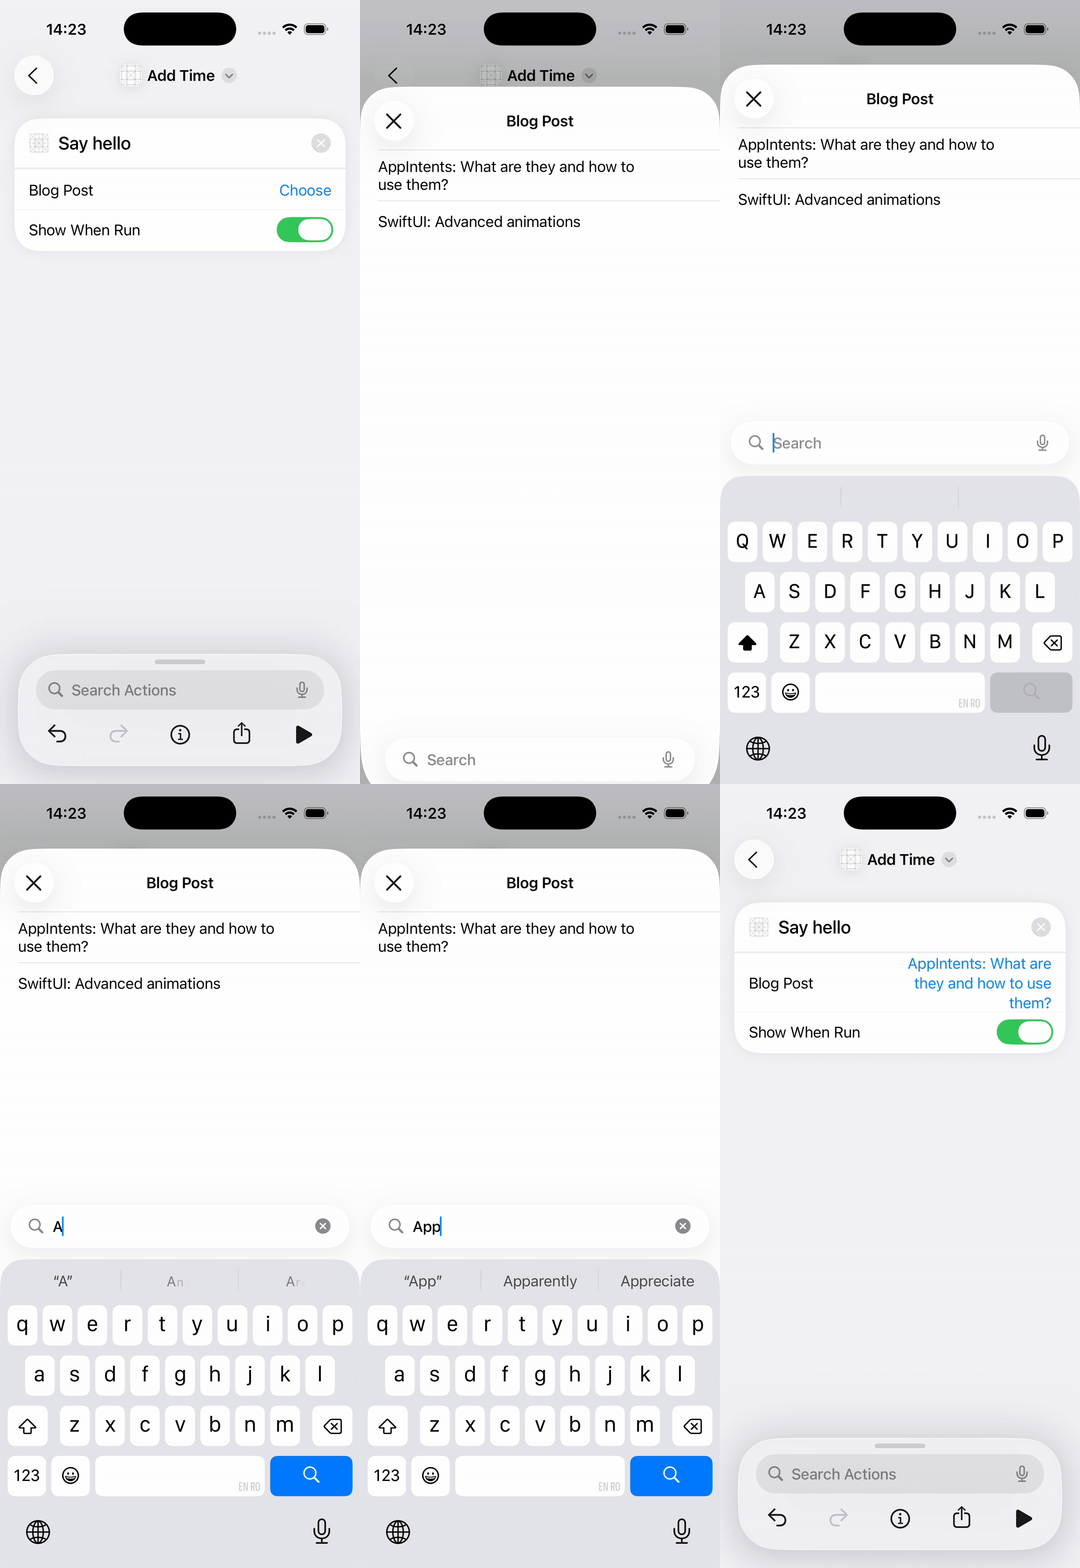
Ok, ok. But what if the list of possible entities is a lot longer? For that, there is a special type of entity query, the EntityStringQuery. Let's see how it works.
struct BlogPostQuery: EntityStringQuery {
    // ...

    func entities(matching string: String) async throws -> [BlogPost] {
        Self.dataStore.values.filter { $0.name.lowercased().contains(string.lowercased()) }
    }
}
The EntityStringQuery is a special type of query, that allows searching for data through a simple text field. It has one requirement, the entities(matching:) method, that is supposed to filter the data for the given query. Let's see how that changes our intent:

Conclusion
By leveraging AppEnum and AppEntity, you can make your App Intents much more powerful and user-friendly. AppEnum is perfect for exposing static sets of options, while AppEntity lets you work with dynamic, app-specific data in a way that integrates seamlessly with system features like Siri and Shortcuts. With these tools, your app’s functionality becomes more discoverable and accessible, providing users with richer, more personalized experiences. If you haven’t explored these features yet, now is a great time to start enhancing your app’s integration with the broader iOS ecosystem.
Related articles
Here are some more articles that may interest you. Check them out!
The TimelineView
published on November 2, 2025
SwiftUILearn how to use SwiftUI’s TimelineView to build time‑based animations. This article explains scheduler options, shows practical examples (pauseable clock, smooth minute‑progress ring with hue shifts and tick marks), and helps you choose the right schedule for smooth or precise updates.
Read moreFoundation Models
published on October 8, 2025
SwiftAILearn how to use Apple’s foundation models to run large language models locally on iOS. This article covers chat, streaming responses, structured data generation, and custom tools, helping you build secure and responsive AI features without relying on the cloud.
Read moreWorking with CoreBluetooth
published on September 30, 2025
SwiftiOSDiscover how to use CoreBluetooth in iOS to build apps that communicate with Bluetooth Low Energy devices. This article explains the roles of central and peripheral, how services and characteristics work, and provides a practical example for implementing both sides of BLE communication in Swift.
Read more